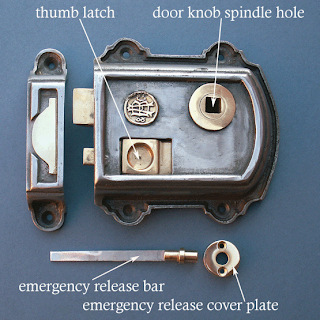
Rim Latch and keep – Screws - Emergency release catch
Tools Required
Drill – 12mm & 7.5 drill bits – Slotted screwdriver – Rule/ tape measure – Pencil – Junior hacksaw
Fitting Your Lock
Step 1 – Decide exactly where you intend fitting your rim lock or rim latch and offer it up to the edge of the door. Check to see if there is sufficient clearance between the door and door frame to allow you to secure the lock. Let return of lock into edge of door, as necessary.
Step 2 – Mark the centre of the square hole required for the door knob spindle using a pencil. Drill this hole using a 12mm drill bit.
Step 3 – Offer the lock back up to the door and fit your spindle and door knobs. Secure your lock to the door using the screws provided.
 Step 4 – Close the door and mark the position of the keep on the door frame. Let the keep into the architrave / frame as necessary, ensuring that the thumb latch is able to slide into the keep. Secure using the screws provided.
Fitting the Emergency Release
Step 5 – Carry out steps 1-3 above, then remove the rim lock from the door and place it face down on a clean flat surface
Step 6 – Fold the tracing paper template (provided) towards you, along the dotted line. Place the template no the back of the lock, ensuring that it sits accurately over the pre-drawn line. Mark the centre of the square spindle hole, all the screw holes and the emergency release slot on the tracing paper.
Step 7 – Now place the template tight up to the edge of the door in the position previously occupied by your lock. Ensure that the template is the right way up and that both the spindle and the screw hole centre marks line up with the holes you have already drilled. Check, re-check then mark the centre of the emergency release slot on the door, through the tracing paper. Drill this hole using a 7.5 mm drill bit.
Step 8 – Cut your emergency release bar to the correct length – allowing for BOTH the thickness of you door and the section of bar that needs to be located inside the slot in the back of the lock.
Step 9 – Push the emergency release bar through the hole you have drilled in the door (from the opposite side to the lock). Place the round emergency release cover plate over the slotted end of the bar and secure using the two screws supplied. Offer the rim lock up to the door, ensuring that the release bar locates in the slot on the back of the lock. Secure the lock using the screws provided and fit your door knobs
.Step 10 – Check that your emergency release works. (Please note that your emergency release ONLY operates to pull-back the catch, not the other way around – that is to say that you can’t lock the door using the emergency release).
Your rim lock and emergency release is now ready for use.
CLEANING
Spray periodically with a good quality furniture polish and dust with a soft, dry, clean cloth. (N.B.) Cast iron rim locks are sprayed with silicone to protect them from moisture. You may wish to remove any excess spray with a dry cloth or tissue before fitting. Cast iron locks should NOT be used externally or in very damp conditions)
These fitting instructions are the same for all of our rim locks and rim latches, bearing in mind only the latches have the emergency release.
These fitting instructions are the same for all of our rim locks and rim latches, bearing in mind only the latches have the emergency release.

No comments:
Post a Comment